Saturday, November 2, 2013

The great stacked leather heel experiment.

A client requires heels on her dancing shoes. So I attempted some low heels as an experiment. Spoiler: this is a mostly failed experiment.


The first thing I did after making the uppers was to ruin them. As I was ironing the finished upper, it belched out hot water and caused the dye in the interlining to bleed all into the white silk. I had to almost start over again.

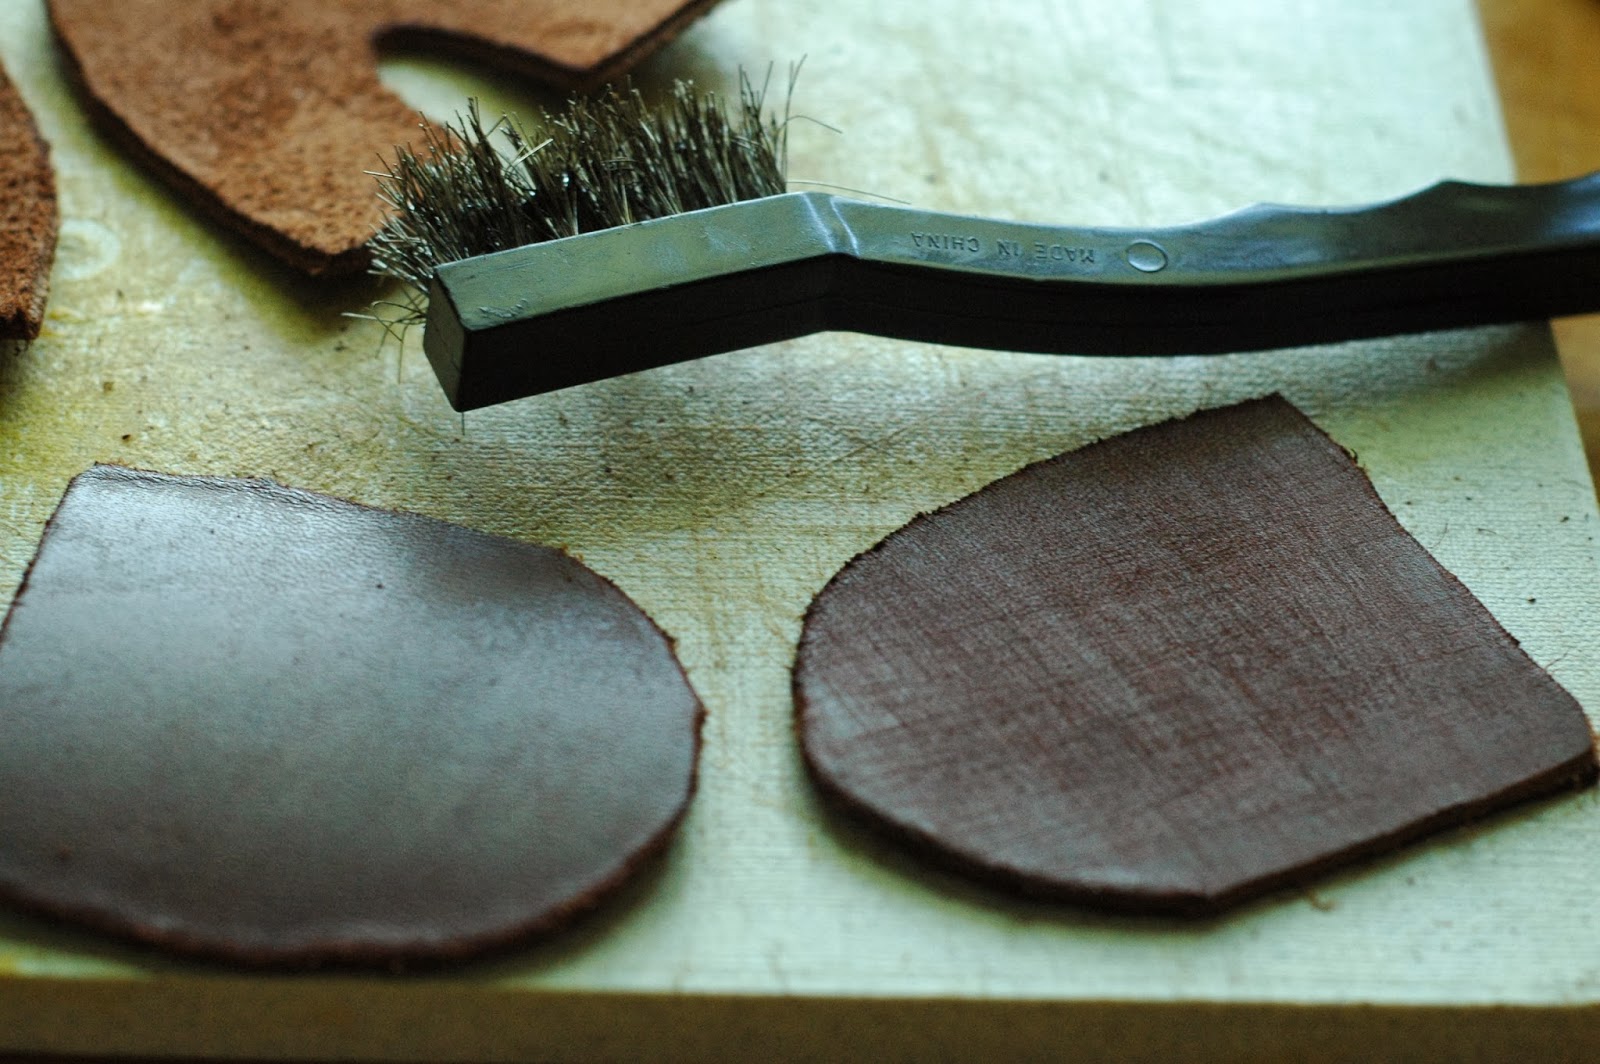
Once I got over that, I attached the sole as I would to any turnshoe, it was time to stack the heels. I cut out 6 layers per heel. The top two layers are hollowed out in the middle to make a cup for the ball of the foot.


I hammered them to harden the leather.

Then I scratched them with a wire brush to make the glue adhere better.


After they were glued, I carved down the sides. I got them fairly nice and smooth, burnished the edges, and then realized they were totally the wrong shape. These are for a lady's dancing shoe, not for a men's boot.
So I cut them down again. Then I burnished the edges with soap and wax. They are nowhere near as smooth as I would like, but I have many ideas of how to do it better next time.
They were attached using tiny, tiny nails and more glue.


The next step is to harden the arch with a hammered leather shank and add cork cushioning under the ball of the foot. I'm not sure I left enough room in the shoe for for this added thickness, so they might not fit by the time I finish. The silk and the slipper shape is extremely unforgiving in terms of fit. It is so much easier to make the boot shape or to work with wool. But that's why I made this experimental pair -- to find things out.


The Victorian Heel Connundrum

Turnshoes of the homemade quality.

​​
Turnshoes are so simple. They are so easy. They require no skills beyond basic sewing, and that's great! I love making turnshoes!


Add a heel and now you're a cobbler. Or are you?

Is it as simple as adding a heel to a turnshoe? Well, there is evidence that this was done, but you really shouldn't.

Without something rigid in the arch, it is like standing on a lego in a ballet shoe. Not nice. The shoe collapses like a bad bridge as the heel heads one way and your toes head another.. The slideshow to the left shows some un-balanced, un-reinforced shoes that appear to be turnshoes with a heel nailed on.

Even today, ballroom dancing will tell you that if your shoe heels get crooked, it is because you weren't on the balls of your feet enough. But I don't think I can tell my customers to just walk tippy-toe to make their shoes last.

Arch support
​​
Steel shanks were exhibited in 1851, but I doubt they were in widespread use until they were patented in the 1870s. So I'm not sure how some of these shoes hold up their arches.


Some of them have French heels reminiscent of the 18th century styles, which provide arch support. To make these, I need to figure out how to carve two identical heels of very complicated shape. Traditionally they are held on by the fabric covering, rather than nailed on. Then I have to learn the infamous "white seam" where stitches up to 60 per inch were done. These are going to take some time to learn.


Some of them have small wooden heels, well placed and therefore quite contoured with beautiful curves, and also nice high arches. These are the shoes I am interested in. I have a couple theories -- wooden shanks or hardened leather shanks -- but what was their secret?


Thursday, May 16, 2013

Adelaide boots


After sewing uniforms for a couple months, I decided to tackle a small project for my own wardrobe: dainty little side-lacing wool boots. Quite a satisfying morning's project! They turned out great for a first try, and the most time consuming part was sewing twenty eyelets.

I was inspired by these:

http://www.historyupclose.com/gold-rush/Resources3/images/Women's-boots_1850-55.jpg

I've drooled over them for so long. The heavy motorcycle boots I've been wearing to events are not even right for men's shoes. But the leather granny reproduction type boots are so expensive, and besides, they're just not very dainty. I'm usually going for more of the fashion plate look than the farm-wife look, since I portray a seamstress.

And you don't have to be a cobbler to sew fabric shoes. My research keeps turning up patterns and directions for sewing children's shoes and light-use type shoes for adults -- slippers, indoor shoes, dancing shoes, carriage shoes. The Workwoman's Guide Containing Instructions in Cutting Out and Completing Articles of Wearing Apparel, by a Lady has patterns and instructions. http://books.google.com/books/reader?id=JCsBAAAAQAAJ&printsec=frontcover&output=reader&pg=GBS.PA351

The Peterson Magazine has several patterns and instructions, usually for slippers of the dancing or lounging type, but also for this furred boot:
https://play.google.com/books/reader?id=pX7NAAAAMAAJ&printsec=frontcover&output=reader&authuser=0&hl=en&pg=GBS.RA1-PA358

And there are accounts of Southern women learning to make shoes during wartime, due to the scarcity of both manufactured goods and of leather as a raw material.

A Blockaded Family in Southern Alabama notes," We explored scrap bags for pieces of cassimere, merino, broadcloth or other heavy fine twilled goods, to make our Sunday Shoes, Home woven jeans and heavy plain cloth had to answer for everyday. They were sent to the shoemaker to have them soled." 
quoted in http://www.blockaderunner.com/nlc/info.html

So. I made some shoes, using the furred boot Peterson's pattern, which was sized for about a 5. I compared vague measurements of my foot to the pattern I was drawing, added a tiny bit of length and widened the ankle, and that was that. I traced an insole of a close-fitting shoe for a basic sole outline. The first try fit pretty well.
I used some diagonally twilled wool I had gotten as a swatch, and lined it with 10 oz cotton canvas (more use of the tent scraps!). The binding is scraps of scarlet silk.
I cut it out pretty quickly, and messed up the diagonal twill. It's facing every which a way. The sole right now is just a painted oilcloth -- not ideal for an outside shoe, but canvas and pasteboard soles did exist in homemade indoor shoes. When I get a side of leather for kepis and such, I'll get to resole these.
 Next time, I will make the toes shorter -- the whole toe cap part is past the end of my foot. The whole shoe is a little big for a size 6. I also need to figure out a way to keep the lacing edges from bunching up when the shoe is laced tightly.


Monday, April 29, 2013

Thomas Taylor Montgomery Shell


This Montgomery Depot shell jacket is based off of the famous portrait of Pvt Thomas Taylor of the 8th Louisiana and (more so) off an extant jacket in Echoes of Glory.

http://thecivilwarparlor.tumblr.com/post/46115732563/glimpse-of-a-soldiers-life-private-thomas-taylor
(I couldn't find a public domain image, but here's a link).

Many of the Alabama depots put out plain, butternut-color shell jackets that look so similar, they are impossible to distinguish from another, apart from provenance. But the Montgomery shell has a distinctive piped collar and those chevrons on the sleeve cuffs. I like the looks of it. Also, it was worn by our 6th Alabama cavalry, and nobody else is making it.


I used some wool I had on hand. I got it half off at fashionfabricsclub.com, where I order almost all my wool.  They have such good prices, but it's always a surprise when it comes in the mail. 

Sure enough, it didn't look at all like the picture or description. In fact, it was better. It looks like jean, since it has contrasting warp and weft threads. But it's Italian wool -- soft and light as a favorite T-shirt. It's delightful. However, I'll produce some real scratchy jean ones, later on.

It was made at the last minute to fit a college friend of my husband's, who came to spend the weekend with us at the Selma event. There was no time to order buttons or trim, so I bought the buttons from Rum Creek sutler on Saturday morning, sewed them on before lunch, and it went into battle in the afternoon. 

The Rum Creek owner gave me great advice on what color wooden buttons to get. They look so beautiful against the fabric. 
The chevrons are made of folded wool fabric, rather than cotton or wool twill tape or lace, since I didn't have time to order anything. I'm not sure if this is a good thing or a bad thing; it was what I had on hand.

I'll do a post soon about these homespun mounted trousers. I learned a lot while making them, so the next pair will be better (and hopefully not have a "girl fly"...oops...that happens when you sew in a hurry!)


The kepi matches. It was made from scraps, and now I think the visor sticks out too far. The sweatband should be reinforced and it isn't (I didn't realize this till later). It doesn't have a chinstrap either, but there are a few in Echoes of Glory that don't either, so maybe that's OK. I'm still learning hat-making. There's a lot to learn.

Finally, here's a picture of my husband (right, wearing the 1st Virginia cavalry shell) together with our friend (left, wearing the Montgomery shell). What a great weekend!

Update:
I did a little more research on the Montgomery depot, and was able to verify the following facts from Confederate Home Front: Montgomery During the Civil War by William Warren Rogers, Jr. There was a clothing depot that issued clothing, tents, and other items. It was under the charge of Major J. L. Calhoun, the Alabama quartermaster. The office was at the corner of Bibb and Commerce in Montgomery. In 1864 the chief clothing quartermaster of Alabama, Captain William Gillaspie, joined the operation, and in late 1864 he had 12 tailors working for the depot.

The next step is to find out exactly what provenance the Museum of the Confederacy has that links the surviving jacket to Montgomery, and to go into the quartermaster correspondence records to try to match up some descriptions to verify and date it. Unfortunately my toddler finds the archives of our library very fun to shout in because of the echo of the domed roof, so I can never in good conscience stay more than ten minutes per visit. These things take a little while.

Thursday, April 18, 2013

1st Virginia Cavalry Jacket - Gala Rock Richmond Depot II


Before I draft my own pattern for a particular garment, I like to learn using someone else's pattern -- in this case, the shell jacket and the Gala Rock Richmond Depot II pattern.

The pattern leaves much to be desired. The neck was in a weird place; the wrists were too small to get normal size man-hands through. I made about a dozen changes to the pattern just for fit. And my husband is quite standard; all his modern Army 40L uniforms fit perfectly. However, I shifted the neck back, added the L to the 40, widened the cuffs, lowered the armscythe, and generally cut and slashed the pattern to bits.

 Once I got a well-fitting base, I made pattern pieces for the cuffs and collar unique to the 1st VA cavalry jacket.  Since it's an early war jacket, I went with the modern interpretation of it. In hindsight, I wish I had reproduced the work of this young man's imaginative tailor:


Since I was portraying a tailor-made jacket, I went full-steam ahead with the modifications to improve and flatter the fit. I did ironwork:


And I added padding to the shoulders. Next time I will try padding the chest as well:


I attached the hussar bar braid before I attached the coat to the body, and I was glad I did. I marked it with flour before pinning, which worked well. It was less difficult to brush off than, say, blue chalk.


 The final product fits very well. However, although my husband loves it -- he is Virginian to the core! -- it still seems wanting, to me, and I'm not sure what isn't quite right. It's not horrible for my first shell jacket, though, and I'll keep making them and probably figure out what is annoying me about it.

We'll get better pictures at the next event, but here's a quick cell phone snap:


Tuesday, February 12, 2013

Godey's wool linen corset

This week I'm sharing my favorite Civil War corset method. It comes to you courtesy of Godey's Lady's Book, 1857, and World Turn'd Upside Down:
http://worldturndupsidedown.blogspot.com/2010/08/corset-pattern-from-ladys-home-magazine.html

A long time ago I made a Martha McCain Simplicity corset: http://img0.etsystatic.com/000/0/6005678/il_fullxfull.172412376.jpg After hours and hours of altering, it still didn't fit properly -- it was so tight all around that in order to cinch the waist, it cinched the lungs as well, so you couldn't breathe. It was a gored pattern. It needed like 14 bones.

This is a gussetted pattern. Basically, you put triangles of fabric in at the bust and hips to add plenty of ease there, so you can still breathe when you tighten the corset. It is so comfy by comparison, and provides a lovely, structured hourglass shape with boning only in front and back.

To make the pattern, you measure yourself, do some math, and draw the pieces out. I might publish my formula, but if you think hard, you can deduce it from the period directions provided on the site.

Check your math twice. Or thrice. Cut your pieces very, very carefully. You might starch and iron your fabric before cutting.

If you did your math right, and you squish at the same rate as the average 1860's size woman, it fits. In other words, if you are very skinny or have a pre-teen figure, your waist might be less squishable, so to speak, and you might draft it with, say, only an inch reduction in the waist. If you are plus-sized, your waist might squish more, you very well might draft it with three to four inches reduction in the waist.

Voila!


I altered the pattern in one regard: all the gussets are triangular, no flat points on the hip gussets. I couldn't quite understand the directions on that, so I fudged it.

My corset is made of two layers of linen, from a thrift store tablecloth, and one layer of wool twill, from a thrift store pair of men's trousers, all heavily starched. I'm not sure how the starch will hold up to sweat, but it sure made the pieces a lot easier to work with. My first corset in this pattern was made with one layer of cotton corduroy and one layer of cotton shirting, and it wasn't quite substantial enough.

The boning in the front and back is some steel strapping and some unknown metal from the tops of some hanging folders. I would not recommend the steel strapping. I bought some on the internet thinking it was 60 feet for $5. Oh foolish I. It was 60 inches, and it had no spring to it. It wasn't even enough for the whole corset since it needed to be doubled up.

For plastic boning, I cut into a plastic vinegar jug. No kidding. It was an inch wide and 3 layers thick, but it turned out to be the perfect amount of support for the bust half-bones. The metal would have been too pokey.

The button-loop front I have instead of a busk isn't period accurate. I mean, there's no reason why they couldn't have done it that way, but I've never seen it on an existing corset. Maybe some pioneer woman did it on her plain work-a-day corset that didn't get saved for future generations. I don't know. I didn't want to special order a busk, and I did want to use the wonderful ceramic buttons from my friend Jess Hovde! I love the greenish bluish tinge they get in firing.


I skipped the metal grommets or "French Holes" and went with hand-done eyelets, courtesy of the Curious Frau: http://www.curiousfrau.com/tutorials/88-how-to-make-beautiful-hand-bound-eyelets
Metal grommets were in use in the 1860's, but even the strongest grommets pull out eventually, and they're rough on the corset strings. Besides, they cost money, and hand-done ones are free. You can see which way I tend to go.

I was so happy with the corset that I flossed it, using Sidney Eileen's wonderful tutorial at http://sidneyeileen.com/tutorials/sewing/corset-detailing/flossing/
Of course I didn't follow the directions exactly. I fudged it. And I've been told that flossing isn't period accurate for the 1860's, but I was having too much fun to stop. The original pattern had directions for a different kind of flossing where you drill a hole in the bone and sew through that to secure it, which I have seen on an extant 1860's corset. I should have done that, but I like the "American Primitive" aesthetic it ended up with.

How to turn regular hoops into oval hoops

This week I'm sewing like crazy to get ready for the Feb 23 reenactment. I finished my favorite corset ever, detailed in the previous post, and in this post, I altered my 9 year old, sutler-quality, (probably polyester) 4 hoop cage into a much cooler, more fashionable, custom, oval shape.

This is my dream hoop. At some point when some striped fabric shows up at the thrift store, I'm making this.

http://whitakerauction.smugmug.com/TashaTudorAuction/Tasha-Tudor-Auction/19144959_rS5MJH#!i=1491278148&k=3sWBHVW&lb=1&s=O (I hope it's OK to post this.)

In retrospect, my hoop wasn't really that big before the alteration, but it felt like this:
Just for fun.
Crinolines, often closely associated with corsets, were a fashion craze of the mid 1800’s. Crinoline as a general term refers the the petticoats or other devices worn under a skirt to make the “hoop skirt” effect. 
http://ornamentedbeing.tumblr.com/post/4702059968

It was so annoying that, for the last reenactment, I never got around to putting it on, since I am always either cooking or chasing my one year old.

So, the process:

I took all the bones out and spread out the skirt, casings facing out, on the floor. This was at 1 AM, and I forgot to take pictures. The shape of mine was a slightly rounded isosceles triangle with the top point being chopped of by the drawstring waist. So I just trimmed a sliver off the front edge to make the silhouette more flat in front. OK, it was more than a sliver. It was about 10 inches at the bottom. I just eyeballed it.


You have to remember to distribute the fullness of the drawstring towards the back when you put it on, but look how dramatic the shape is now! I hope it will look less lumpy with all the petticoats on top.

I chopped off several inches of boning when I put the bones back in, so it's a bit smaller than the original circular hoop.

I'm making a very heavy wool skirt to go over this. We'll see how the weight affects the oval-ness of the hoop.